釣魚
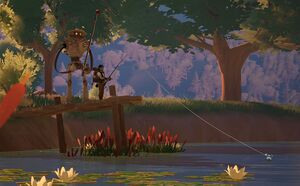
釣魚是帕利亞中的一項技能,可以讓玩家捕獲魚,用於烹飪食譜、收集和出售獲利。
| “ | 帕利亞遍佈河流、湖泊和海灘,魚類資源豐富!魚可以用魚餌或不用魚餌釣上來,可以賣錢、做菜或當禮物。釣魚碼頭的艾納可以幫助你升級釣竿,或提供魚餌和建議。 | ” |
介紹
機制
釣魚需要使用釣魚竿。
Cast a hook out into select bodies of water and wait for a fish to bite! After a fish bites, it can be reeled in to shore.
Different Baits attract different fish; Players can swap which type of bait they are using by holding the rod and right-clicking ( on Switch).
多人遊戲
Fishing near other players will reward all players nearby with a fishing buff.
Catching a fish within a 10m radius of other players will provide them with a 10% reduction in hook time per stack, stacking up to 5 times.
Bonus: When fishing near party members, each player gets a chance at earning double their own catch.
魚的種類
The types of fish that can be found are determined by:
- The body of water
- The time (day, evening, night, or morning)
- The bait used
釣魚熱點
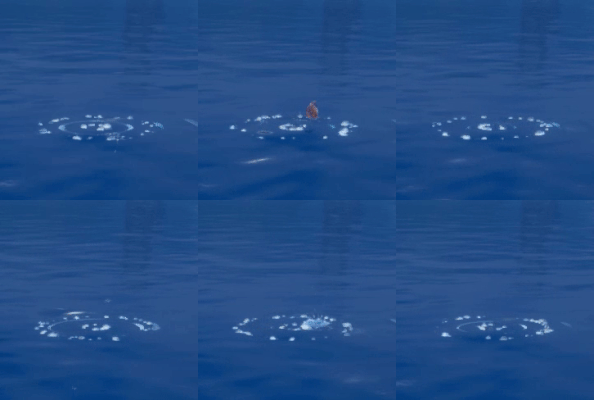
Sometimes, rings of bubbles appear in fishable bodies of water, with a small fish jumping over them. Fishing from a hotspot will yield either a Star Quality fish or a ![]() Waterlogged Chest. Junk items do not appear from hotspots. Fishing from hotspots is the only way to obtain Star Quality fish.
Waterlogged Chest. Junk items do not appear from hotspots. Fishing from hotspots is the only way to obtain Star Quality fish.
Each environment has a limited number of fishing hotspots at any given time. Fishing hotspots do not spawn in every fishable body of water.
Multiple players can fish from the same hotspot, but each player can fish from the same hotspot only once. Fishing hotspots despawn for all players 2 minutes after the first player has fished from the hotspot.
可使用音叉追蹤釣點。
完美捕獲
The game displays a "Perfect Catch!" if the rod health is full when the fish is caught. Perfect catches increase the amount of experience awarded for catching the fish by 20%.
如何釣魚
Players can fish in bodies of water that are deep enough for the Fishing Rod, like ponds, cave pools, lakes, oceans, and deep sections of rivers.
Hooking a Fish
When the fishing rod is equipped, hold down the Primary Action button ( on PC, on Switch) to begin casting. A marker is projected over the surface of where the bobber will land. A light blue marker indicates a valid fishing spot, and a red marker indicates an invalid fishing spot. Release the Primary Action button to cast. It is possible to alter the bobber's placement while casting with the movement keys, allowing for better control over aiming the cast.
When a fish is about to bite, the bobber will bob and make a "splash" sound three times. After the three bobs, a fish briefly jumps out of the water. It is possible to recognize which fish is biting during the jumping animation. When the fish jumps out of the water, click the / Primary Action button to start the fishing minigame.
Clicking the Primary Action button before the fish jumps out of the water, or after the fish has fallen back into the water and swam away, will not start the fishing minigame and the fish will escape. Any bait equipped on the rod will be preserved. If the bobber is left in the water after the fish escapes, the same fish will bite again. The line must be re-cast to catch a new fish. Tip: If hunting for a specific fish and running low on bait, wait to see which fish you caught before reeling in.
Fishing Minigame
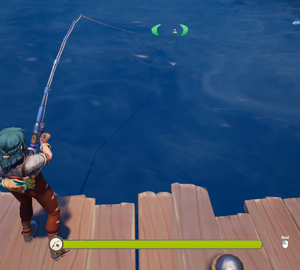
The minigame display consists of a health bar at the bottom of the screen (the fishing rod health) and a pair of brackets over the water (the safe zone). The safe zone can be moved left and right with the mouse on PC or with the Right Analog Stick on Switch, and the fish can be reeled in by holding the / Primary Action button. The goal of the minigame is to reel in the fish without allowing the fishing rod's health to fully deplete. The fish escapes if the health bar becomes empty.
Hooked fish can attempt to damage fishing rod health by dragging the bobber out of the safe zone and by jumping out of the water. The safe zone is green when the bobber is within the safe zone and the fish is not jumping - reeling will not damage the rod and rod health regenerates slowly. The safe zone is yellow when the bobber is within the safe zone but the fish is jumping - health recovery pauses and reeling will damage the rod. The safe zone is red when the bobber is outside of the safe zone - rod health will deplete quickly when reeling and slowly when not reeling. If the bobber is outside of the safe zone while the fish is jumping, the safe zone appears red, but fishing rod health does not deplete so long as the player is not reeling.
Upon catching a fish, its name is displayed and it is placed in the player's Inventory. If the health bar is full when a player catches a fish, a message saying "Perfect Catch!" is displayed. If the player catches a new fish, a message saying "New Fish!" is displayed. Players can keep track of which unique types of fish they have caught in their Accomplishments menu. Each fishing minigame attempt, whether successful or unsuccessful, uses one equipped piece of Bait.
Fish Behavior
There are different styles of behavior that each type of fish can exhibit in the minigame.
Some types of fish move in predictable patterns, but most types of fish move more randomly with differences in the timing and frequency of changing direction, changing speed, stopping movement, and jumping.
Generally, types of fish found with higher tiers of bait move faster, and higher rarity fish have more difficult movement styles.
Fishing Rod Health and Recovery Rate
Maximum fishing rod health increases with fishing rod upgrades. Health can be further increased by using a ![]() Minor Rod Health Booster, by eating
Minor Rod Health Booster, by eating ![]() Sashimi, or by eating
Sashimi, or by eating ![]() Sushi.
Sushi.
Upgrading the fishing rod does not affect the recovery rate. Recovery rate can be increased by using a ![]() Major Rod Recovery Booster.
Major Rod Recovery Booster.
Safe Zone Speed and Size
The safe zone (brackets) speed increases with fishing rod upgrades. Safe zone speed can be further increased by using a ![]() Major Safe Zone Speed Booster, or by eating
Major Safe Zone Speed Booster, or by eating ![]() Fish Stew.
Fish Stew.
Upgrading the fishing rod does not affect the safe zone size. Safe zone size can be increased by using a ![]() Major Safe Zone Size Booster, or by drinking
Major Safe Zone Size Booster, or by drinking ![]() Fisherman's Brew.
Fisherman's Brew.
Hook Time
The hook time measures the amount of time that passes before a fish bites once the fishing rod is in the water.
Using a ![]() Major Hook Time Booster or eating
Major Hook Time Booster or eating ![]() Trout Dinner decreases the amount of time it takes for a fish to bite.
Trout Dinner decreases the amount of time it takes for a fish to bite.
Fish-Free Finds
When fishing, other items will occasionally be hooked instead of a fish. These items need to be reeled in like any other fish during the fishing minigame and will consume bait.
Waterlogged Chests
Waterlogged Chests are consumable items that can be fished from any body of water using no bait, Worms, or Glow Worms. Each Waterlogged Chest contains one random Makeshift furniture item piece.
垃圾
| 圖片 | 物品 | 描述 | 地點 | 魚餌 | 上鉤時間 | Value |
|---|---|---|---|---|---|---|

|
Ship Fragments | A common piece of garbage found in the ocean. Evidence of a recent shipwreck. | Bahari Coast | None, Worm | All Day | |

|
Wagon Wheel | A common piece of garbage found in and around Crystal Lake. Perhaps a relic from travelers passing through. | Kilima Rivers, Bahari Rivers | None, Worm | Any Time | |

|
Waterlogged Boot | A common piece of garbage found in Mirror Pond. | Ponds, Caves | None, Worm | All Day |
烹飪配方
Quest Items (Found Item Quests)
| 圖片 | 物品 | 描述 | 任務 | Source |
|---|---|---|---|---|

|
Strange Relic | A strange relic you found while fishing. Maybe one of the villagers would know what it is? | Fishing in Kilima Lake. | |

|
Founder's Boot | A boot you fished out of the waterways in Kilima Village. Resembles the legendary "Founder's Boot", which originally belonged to the founder of Kilima Valley | Fishing in Kilima Rivers. | |

|
Bone Fragment | A large bone fragment found while fishing. Jina might know what it is. | Fishing in Bahari Coast. | |

|
Slimy Ball | A slimy, algae covered ball you fished out of the river. Has visible Plumehound-sized bite marks all over it. | Fishing in Bahari Rivers. | |

|
Star Chart | The flattest fish you've caught so far. Einar probably wants to know what kind of bait you used. | Fishing in the Temple of the Waves with Worms. |
提示/技巧
Consumables
Certain consumables, such as cooked dishes, will temporarily grant boosts that make fishing easier. Different types of boosts can be active at the same time, but the same type of boosts do not stack.
| 物品 | 描述 | 材料 | 集中力 | Boost | Boost Duration | Recipe Source |
|---|---|---|---|---|---|---|
 Fisherman's Brew
|
This suspicious drink has a strange odor that can only be described as 'mossy,' but Einar swears by it. Buffs fishing reticle size for a short time. |
|
Fishing Guild (Level 5) | |||
 Fish Stew
|
A basic fish stock seasoned with garlic and spices. Buffs fishing reticle speed for a short time. |
|
Fishing from Bahari Coast using a Worm. | |||
 Sashimi
|
A minimal meal of slices of raw fish, with a side of plain rice. Buffs fishing rod health for a short time. |
|
Fishing from Bahari Rivers without bait. | |||
 Sushi
|
A pleasant meal of seasoned rice topped with raw fish, garnished with spices. Buffs fishing rod health for a short time. |
|
Fishing from Ponds using a Glow Worm. | |||
 Trout Dinner
|
Garlic-seared trout with potatoes, created so ancient humans could share Einar's love of fishing. Hook fish more quickly for a short time. |
|
Found in Einar's Cave. | |||
 Tuning Fork
|
Allows you to track fishing nodes for 15 minutes. |
|
Fishing Guild (Level 8) |
每週挑戰
Weekly Challenges are skill-related Accomplishments that a player can complete once weekly upon reaching 釣魚 Level 10. A player can complete up to 3 Weekly Challenges for 釣魚 each week, awarding a total of ![]() 100 Fishing Medals.
100 Fishing Medals.
Weekly Challenges are currently the same every week, and reset every Monday at 4:00 AM UTC. Progress from uncompleted Challenges will carry over and count towards the following week.
| Title | Requirement | Reward |
|---|---|---|
| Catch of the Week | 釣30條魚。 | |
| Quality Catch | 釣10條頂級魚。 | |
| Friendly Fisher | 和其他玩家一起釣10條魚。 |
成就
| Title | 需求 | Rewards |
|---|---|---|
| 高階釣手 | 達到垂釣等級10 | |
| 專家釣手 | 達到垂釣等級25 | |
| 大師釣手 | 達到垂釣等級50 | |
| 我的第一隻稀有魚 | Catch a rare fish | |
| 我的第一隻史詩魚類 | Catch an epic fish | |
| 吉力馬與巴哈里魚類收藏家 | Catch every fish | |
| 大師吉力馬與巴哈里魚類收藏家 | Catch every fish at star quality | |
| 我的第一個進水的箱子 | Fish up a Waterlogged Chest | |
| 簡陋東西都我的 | Collect every piece of Makeshift furniture | |
| 捕魚 | Catch Fish. |
Associated Equipment
Rods
Attachments
Bobbers
更新歷史
Build 0.172:
- Fishing hotspots in Bahari Bay have been improved. 🎣
- All hotspots will now respawn faster
- Several new hotspots have been added across a few locations.
- We also fixed some hotspots specifically in the Flooded Fortress (Bahari Bay) area.
- All hotspots will now respawn faster
Build 0.170:
- Added the option to adjust the fishing rod cast speed in the Guide:設定 menu.
Build 0.168:
- Added Pyroflow Bobber as a bundle reward from the Temple of the Flames.
Build 0.167:
- Added new "Found Item" Fishing quest.
Build 0.166:
- Increased the experience gained from Fishing.
- Increased the number of Fishing hotspots in the Mirror Pond Ruins.
- Increased the number of Fishing hotspots in the Pavel Mines.
| Palia Wiki | |
|---|---|
| Villagers | |
| Skills | |
| Items | |
| Locations | |
| Game Mechanics | |
| Premium Store | Overview • Premium Store Outfits • Glider Skins • 寵物 • Tool Skins • Landscapes |


